
How many times you wanted to know if an Ethernet plug or port has internet connectivity and you had to bring your laptop or a cable from the next room to check? And how many times the only tools available were the simple Network Cable tester and your provider’s Modem or Router? For me that was a common issue and of course there was no easy, "plug and play" solution (at a reasonable price!!). Taking these into consideration I decided to give a solution by making a simple optimization to the most common Network tool. Arduino Network Tester, extends the functionality of the well-known Network Cable tester by adding DHCP, DNS and Internet connectivity tests using an Arduino Pro Mini and a W5500 Ethernet Shield with an overall cost of less than €15!
How it works
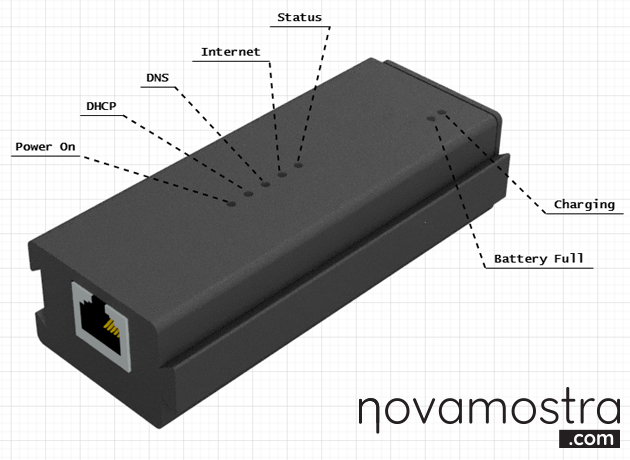
When turned on, the Power LED is ON and the Status LED is flashing, until you connect an RJ45 (Ethernet Cable) from an OSI Layer 3 device (e.g. router) to the W5500 ethernet port. Following this, the device runs the tests one by one starting with DHCP where it requests an IP address. If configuration from a DHCP Server is successfully received then the DHCP LED turns on. As a next step the device tries to resolve the url www.example.com to the appropriate IP and if successful then the DNS LED turns ON. Finally,it makes an HTTP request to the domain www.example.com and parse the result. If the returned HTTP Status Code equals to 200 then the Internet Connectivity LED turns ON. Once the Status LED turns ON then all the checks have been completed, either successfully or unsuccessfully.
Bill of Materials
1) Double Side Thru-Hole Prototype PCB Board (at least 70*90mm)
2) Arduino Pro Mini 3.3v 8MHz
3) W5500 Ethernet Shield
4) 5 LEDs (SMD 0805)
5) 5 330 Ohm Resistors (SMD 0805)
6) Battery Charger (TC4056A)
7) 3.7V 100mah LIPO battery with XH 2.5mm connector
8) B2B-XH-A 2 Pins connector
9) On-Off switch (SS-12F15G)
10) 2.54 mm Pin headers
Burn optiboot Bootloader
When the ethernet cable is disconnected from the tester, the device resets using the WatchDog Timer (WDT). The default bootloader of Arduino Pro Mini has an annoying bug which actually keeps the tester in a reset loop after calling WDT_reset(). To solve this issue you have to burn the Optiboot Bootloader. You can find how to burn a new Bootloader to Arduino Pro mini using an Arduino UNO here. Follow the instructions and before burning the bootloader to Arduino Pro Mini use the following settings in Arduino IDE:

Pinouts
W5500 Ethernet Shield to Arduino
| Arduino PIN | W5500 Ethernet Shield |
|---|---|
| 10 | CS |
| 11 | MO (MOSI) |
| 12 | MI (MISO) |
| 13 | SCK |
| GND | G |
| VCC | V |
TP4056 Power and Charging
The Power Switch handles the battery’s connection. On the one side of the switch the battery connects to the charger and on the other side it provides power to the tester. In the current implementation you can’t charge the battery and power the tester at the same time. To enable this functionality a load sharing circuit must be used.
Prototype PCB Board Design
Arduino Network Tester is consisted of two double sided thru-hole prototype PCB boards:
1) the top with the LED Indicators
2) the bottom, with the rest circuit.

The two PCBs are then stacked together, using 2.54mm connectors to distribute the power and the signals to the LEDs. The battery can be replaced using the XH 2.5mm connector, and the switch is removable in order to be positioned on the 3d printed cover.

Code
Use Arduino IDE and a USB-to-TTL serial converter to upload the following sketch to Arduino Pro Mini. If this is the first time you are doing this, you can follow the official instructions.
#include <SPI.h>
#include <Ethernet.h>
#include <Dns.h>
#include <avr/wdt.h>

#define PWR_LED 6
#define DHCP_LED 5
#define DNS_LED 4
#define INT_LED 3
#define STATUS_LED 2

//Here you can set your own mac address
byte mac[] = { 0x00, 0xAA, 0xBB, 0xCC, 0xDE, 0x02 };

DNSClient dns_client;
EthernetClient eth_client;

char server_url[] = "www.example.com";
// www.example.com resolves to 93.184.216.34
// if you change server_url you must also change server_ip
byte server_ip[] = { 93, 184, 216, 34 };

//the resolved ip from the DNS query
IPAddress server_ip_resolved;

boolean dns_resolved = false;
boolean http_responded = false;

long last_blink = 0;

void init_leds() {
  pinMode(PWR_LED, OUTPUT);
  pinMode(DHCP_LED, OUTPUT);
  pinMode(DNS_LED, OUTPUT);
  pinMode(INT_LED, OUTPUT);
  pinMode(STATUS_LED, OUTPUT);

  digitalWrite(PWR_LED, HIGH);
  digitalWrite(DHCP_LED, HIGH);
  digitalWrite(DNS_LED, HIGH);
  digitalWrite(INT_LED, HIGH);
  digitalWrite(STATUS_LED, HIGH);
  delay(500);
  digitalWrite(DHCP_LED, LOW);
  digitalWrite(DNS_LED, LOW);
  digitalWrite(INT_LED, LOW);
  digitalWrite(STATUS_LED, LOW);
}

void reset_leds() {
  digitalWrite(DHCP_LED, LOW);
  digitalWrite(DNS_LED, LOW);
  digitalWrite(INT_LED, LOW);
  digitalWrite(STATUS_LED, LOW);
}

void flash_led(int led, int blink_delay) {
  if (millis() - blink_delay > last_blink) {
    if (digitalRead(led) == HIGH) {
      digitalWrite(led, LOW);
    } else {
      digitalWrite(led, HIGH);
    }
    last_blink = millis();
  }
}

void setup() {
  // Open serial communications and wait for port to open:
  init_leds();

  //while no cable is connected wait
  while (Ethernet.linkStatus() != LinkON) {
    flash_led(STATUS_LED, 1000);
  }
  //A cable has been connected, stop flashing Status LED
  digitalWrite(STATUS_LED, LOW);
  // Obtain an IP using DHCP
  if (Ethernet.begin(mac) == 0) {
  // Static Configuration: comment the previous line,
  // uncomment the following line and set appropriate values:
  // if (Ethernet.begin(mac, ip, dns, gateway, subnet)==0) {
    while (true) {
      //Failed to configure Ethernet using DHCP
      flash_led(DHCP_LED, 1000);
      digitalWrite(STATUS_LED, HIGH);
    }
  } else {
    //DHCP Configuration completed
    digitalWrite(DHCP_LED, HIGH);
    // give the Ethernet shield a second to initialize:
    delay(1000);

    //Check DNS
    dns_client.begin(Ethernet.dnsServerIP());
    if (dns_client.getHostByName(server_url, server_ip_resolved) == 1 && server_ip_resolved == server_ip) {
      //DNS is working
      digitalWrite(DNS_LED, HIGH);
      dns_resolved = true;
    } else {
      //DNS failed
    }

    //Check Internet Connectivity
    if (eth_client.connect(server_url, 80)) {
      http_responded = false;
      eth_client.println("GET http://" + String(server_url) + " HTTP/1.1");
      eth_client.println("Host: " + String(server_url));
      eth_client.println("Connection: close");
      eth_client.println(); // end HTTP request header
    } else {
      //Unable to establish an http connection
      digitalWrite(STATUS_LED, HIGH);
    }
  }
}

void reset_WDT() {
  wdt_enable(WDTO_15MS);
  while (1) {};
}

void loop() {
  //If cable unplugged reset
  if (Ethernet.linkStatus() != LinkON) {
    reset_WDT();
  }

  // Handle HTTP Client response
  String response = "";
  while (eth_client.available() && !http_responded) {
    char c = eth_client.read();
    response = response + c;
    //Find the first carriage return, this line returns the status code of the HTTP server
    if (c == '\r') {
      http_responded = true;
      eth_client.stop();
      //if page loaded then internet connectivity exists
      if (response.indexOf("200") > 0) {
        digitalWrite(INT_LED, HIGH);
        digitalWrite(STATUS_LED, HIGH);
      } else {
        //Failed to load the page, Internet connectivity does not exist
        digitalWrite(STATUS_LED, HIGH);
      }
      break;
    }
  }
}
The code is available on github
3d Files
Arduino Network Tester consists of 4 seperate 3d printed parts:

- Outer Shell
- Back Cover where pcb is mounted
- Power Module LED Indicators Separator
- LED Indicators Separator
All parts are available on thingiverse
Assembled and Operational!
Future Updates
- Code optimization to allow Arduino to sleep for less Power Consumption
- Battery Level Indicator
Customization – Local Network Testing
With simple code changes, the Arduino Network Tester could be used to check the configuration of isolated local networks, using local Web Server/Router page instead of example.com and/or Static DHCP configuration (uncomment the appropriate line) in the case of a local network without DHCP Server.
Very nice. I can’t even find anything commercially comparable that would be any cheaper or easier to use than plugging in a laptop.